All posts with full editing enabled (pages, news, conferences) have an editing view (See below) this is a dashboard that allows you to add, edit, and remove content from a post or page.
This tutorial will go through some of the common features and procedures when editing a post.
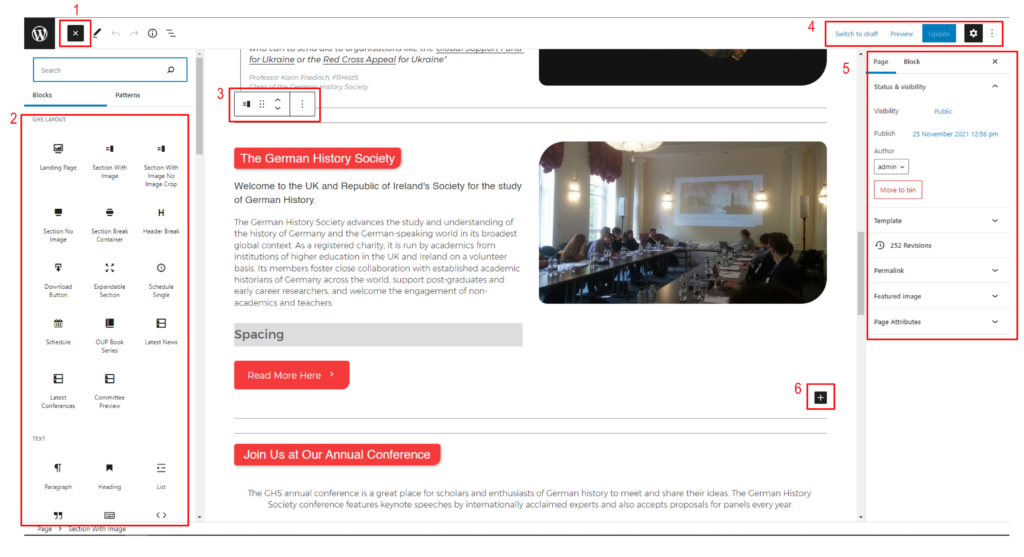
Blocks
Before we get started on editing, we need to learn about Blocks, these are the basic building components of a WordPress site. All content you see within a page or post is some form of block.
The default and most basic of these is the paragraph block (See 2 -> text -> paragraph), this is the default block that appears when either the enter key, or the block add button is pressed (See 6). It’s only use is to allow the user to enter text within a post or page, and it functions very similarly to text editors such as Microsoft word, allowing similar formatting such as Bold or Italic, and allowing spacing between paragraphs.
Other text blocks are the Heading, List, and Quote blocks, these are mostly self explanatory and are similar to their counterparts in normal text editor software.
There are also multiple custom blocks that have been made for ease of maintaining the GHS site, these are located in See 2->GHS Layout. These custom blocks are the primary blocks used on the GHS site, and have set styling and formatting.
You should try to use a GHS layout block before trying to recreate layout using other default blocks unless you have good experience with wordpress, as default blocks will have unexpected formatting issues on the site compared to the pre-prepared custom blocks.
Below is a list of blocks that have set formatting and should be all you need to add to and maintain the GHS site:
- GHS Layout –
- All Blocks
- Text –
- Paragraph
- Heading
- Quote
- List
- Media –
- Image
- Gallery
- Video
- Design –
- Buttons
- Row
- Stack
- Spacer
Block Context Menu
The block context menu (See 3) appears when you have clicked on block within the post to edit.
The context menu displays many actions that can be done to edit the currently selected block, a reference for the context menu is listed below, from left to right:
- Block Icon
- The first item in the context menu, this is the current block icon, this lets you know what block you have selected, if the current block is nested within another block, then clicking this icon steps you through all nested blocks.
- When the top level block is reached, clicking the block icon will instead prompt you to transform the current block to another, this can not be done for all blocks, only compatable ones, eg. a paragraph can be transformed into a heading or a list, a row can be transformed to a group.
- If the Block is nested, then the second item in the context menu will instead be the transformation button
- Block Drag and Drop
- The second context menu item (a collection of six dots) allows you to drag and drop the block to another location within the page.
- This is a useful action, however it can be quite finicky, and blocks don’t always go exactly where you want them, sometimes the block must be “wiggled” to ensure it drops into the correct location.
- Block Up/Down
- Similar to Block drag and drop, except this action only changes the blocks order in relation to other blocks at the same level.
- eg. if two paragraphs are nested in the same block, this action will move the two paragraphs up and down in relation to each other, but they will not break out of their nested block
- Blocks Context Menu
- A collection of three dots, this will open a secondary context menu with more specific actions that can be carried out on the selected block, most of these are relatively self explanatory.
There are more items that can appear in a blocks context menu, depending on the block selected, that will generally relate to style (Bold, Italic), or layout options (centre, left, right), have a play around with different block to discover what they all do.
Another use is changing heading types, headings have types H1-H6, H1 is the bold red type seen throughout the site, and 2-6 are black bold font but progressively get smaller.
Page / Post Context Menu
The page context menu can be seen on the right (See 5) This side can be generally ignored in most cases, the actions that require it will be explained in detail later in this tutorial.
The few that will be relevant most of the time are:
- Visibility, just to make sure the post is published and is not a draft or private.
- The Revisions section, this can be useful if you notice a mistake in an already updated post, as you can revert the post back to an earlier revision.
- Featured image, this is used with many post types but can be set outside of the full editor as well.
Block Context Menu
This can be accessed by clicking “Block” on the right side of the page (See 5), again this will not be used very often, but there are a few functions that can be useful:
- Changing text size to a specific size, if the various headings aren’t specific enough.
- Changing text colour, use this sparingly to prevent a visual mess.
- Changing Button style, buttons have two styles, filled and outlined. Sometimes outlined can be preferable if there is already a lot of red on the page.
- Changing spacer height to a specific height.
- Hiding Download button file preview when a pdf is linked.
- Adding an anchor link to a heading (Advanced->Html anchor) so it can be linked to via an url.
Outside of those functions try not to fiddle with specific settings too much, as they can interrupt block styling in unpredictable ways.
Adding a New Block
Use the “+” (See 6) button to add a new block, note that added blocks will always be added within the current nesting, so make sure you select the top level block and add after that if you want the added block to be separate from the last.
After pressing button 6, you will see a blank paragraph block, either use the quick add (“/” + <block name>) or use the block menu on the left to view all available blocks.
Adding a link
To add a link to a piece of text or a button, use the block context menu. Select a piece of text with the cursor, and in the block context menu, click the link icon (See Below) and then paste in your link, you can also start typing a page or post name to see a list of pages or posts that match.
Inline Elements
If you would like to place two blocks horizontally next to each other, use the “row” block:
Row Block 1
Row Block 2
Adding space between blocks
Use the “Spacer” (Design->Spacer) Block to add vertical space between two blocks, this can be useful to separate sections of a page.
Simply drag the blue circular handles to increase of decrease the size, or use the block settings on the right to input a precise number.
Try to keep the spacing consistent between pages or it may start to look strange, for example, I often use multiples of thirty for large spacing (30px, 60px, 90px) and 10px for small spacing.
Most blocks should separate themselves out naturally, so only use spacing as an exception not a rule.
Custom Blocks
The GHS site is using a custom theme complete with many bespoke blocks to help you maintain the site, go to:
https://germanhistorysociety.org/docs/editing/editing-essentials/custom-blocks/ to see them all.
External Help
WordPress has published a more detailed help page on the various functions of the editor if you are interested in more specific help, see here: https://wordpress.org/support/article/wordpress-editor/
Tips and Tricks
- To add a block quickly, simply press enter to create a new paragraph block, then type “/” + the block name to bring up a list of blocks matching that name. For example “/heading” would bring up the heading block, “/image” the image block, etc.
- If you are having trouble discerning which block you currently have selected, then you can enable “spotlight mode”, this greys out every block apart from the one currently selected. Go to the right hand corner three dot menu -> View -> Spotlight Mode.
- Remember to always preview the post or page before pushing the page update, as things can often look different in the editor than on the actual site.
- If you make a mistake while editing, you can use undo and redo similar to a normal text editor (undo: ctrl+z, redo: ctrl+shift+z), you can see the undo and redo arrows at the top of the page.
- Remember if you publish a mistake by accident that can’t be fixed via simple editing, you can always revert the page to a previous version. See #page-post-context-menu